Introduction
This documentation describes the steps to use Open Bee™ Portal as a CNBC as defined in the NF Software Standard – CCFN.
This documentation uses the abbreviations defined in the NF SOFTWARE – CCFN standard.
The abbreviation ESC is used to refer to the Secure Storage Space component of Open Bee™ Portal.
Installation
The prerequisite for using Open Bee™ Portal as a CCFN is the installation of it.
To do this, refer to the installation documentation.
 In the case of an installation in an on-premise network, ensure that the operating environment is subject to security measures appropriate to the intended use of the CNBC. A risk study is recommended.
Settings
The policy for reinstating documents converted by Open Bee™ Scan OCS should only be configured with the “Replace Original Document” option. More details on this setting can be found in the “Administrator / Open Bee™ Scan OCS” guide.
Creation of a CNBC
After the installation of Open Bee™ Portal, a first user, with the role “Administrator”, is created. It is a user specific to Open Bee™ Portal that does not correspond to any role in the CCFN sense.
In order to create a first CCFN, log in with this user, then go to the “Administration Secure Storage Area and Vault” section and click on the “Add” button.
A window will appear asking you to choose the type of safe space you want to create:
- An ESC
- A CCFN
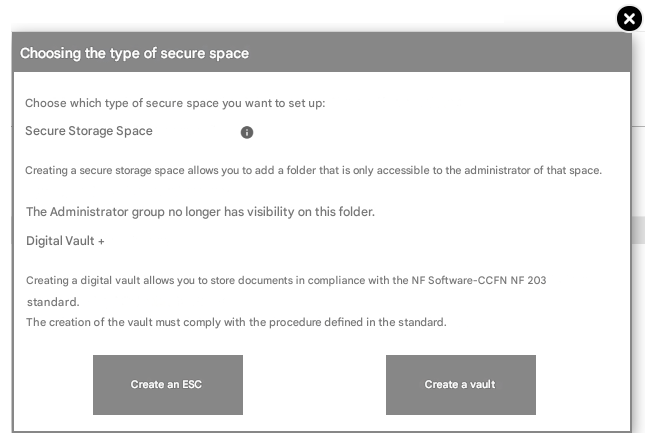
A Secure Storage Area is a special folder with special access permissions. Refer to the ESC Administration documentation for more details.
Choose “Create Vault” to create a CCFN.
You will then be prompted to choose:
- The CNBC file that you want to change to an NBBC.
- The Deputy Head (UTI-G) of the CNBC.
At this stage, a CCFN is created and operational.
The number of CCFNs is not limited, so it is possible to create multiple CCFNs within the same Open Open Bee™ Portal installation.
Administration of a CNBC
User Management
The users of a CNBC are first and foremost users of Open Bee™ Portal. It is therefore advisable to create in Open Bee™ Portal (or have an Open Bee™ Portal administrator create the future users of the CCFN from the “User Administration” section).
 In order to guarantee a maximum level of security of data access, the UTI-S of a CNBC can only be Open Bee™ Portal users with the “External Users” role of Open Bee™ Portal.
Matching Users of an Open Bee™ Portal
| UTI-G | Open Bee™ Portal user defined as the manager of an ESC with no access permissions on that ESC. |
| UTI-F | An Open Bee™ Portal user defined as a UTI-F by a UTI-G on an ESC. |
| UTI-S | An Open Bee™ Portal user defined as a UTI-S by a UTI-F on an ESC. |
The UTI-G and UTI-F have a new “ESC” entry in the Open Bee™ Portal menu allowing them to administer the ESCs.
An Open Bee™ Portal user can be designated as a UTI-G and UTI-F of multiple ESCs.
Creating and Deleting UTI-F
Prerequisites: The users who will be designated as UTI-F must exist in Open Bee™ Portal beforehand.
To edit the UTI-F of an ESC:
- Log in with the user UTI-G,
- Click on the “ESC” entry in the main menu of the application,
- The list of ESCs on which you have UTI-G permission is listed.
- Click on the ESC context menu, then on “Manage Functional Administrators”,
- In the displayed window, add (from the Open Bee™ Portal user list) or remove functional administrators for this ESC.
Creating a Simple User
Prerequisites: Users who will be designated as simple users must first exist in Open Bee™ Portal and have the “External Users” role of Open Bee™ Portal.
To create a simple user:
- Connect with a user designated as an ESC’s UTI-F,
- Click on the “ESC” entry in the main menu of the application,
- The list of ESCs on which you have UTI-F permission is listed.
- Click on the context menu on the ESC, three options are available:
- Add a container
- Manage containers
- Manage Permissions

- If you want to create containers in your ESC, in order to partition it into multiple subsets, see the next paragraph in this documentation. Otherwise, click “Manage Permissions” to create a UTI-S on that ESC.
- The Setting Permissions window opens. Add one row per user and select the permissions you want to apply to each user. The proposed permissions correspond to the functions defined in the NF SOFTWARE – CCFN standard.
Careful: If the vault contains containers, changing the permissions at the ESC level will not be reflected on the containers in the vault. A permission change only applies to the selected item.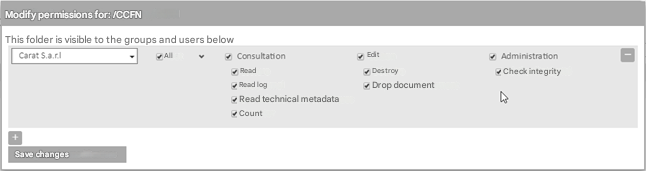
Container Management
A container allows you to partition a CCFN into sub-entities that are isolated from each other.
Technically, each container corresponds to a sub-folder of a Secure Storage Area in the Open Open Bee™ Portal sense.
When a vault contains one or more containers, documents can no longer be dropped directly to the vault root, they must be associated with a container
Create a container
- Click on the ESC context menu, then click on “Add Container”,
- A window appears. Enter a name for the container and validate,
- You can now manage permissions on the container.
Permissions on a container
- Click on the ESC context menu, then on “Manage Container”,
- The list of containers appears. Click on the context menu of a container, then on “Manage permissions”,
- The Setting Permissions window opens. Its use is identical to the permissions screen of an ESC.
Disable a container
- Click on the ESC context menu, then click on “Manage Container”
- Click on the ESC context menu again, then click “Disable”
This removes all access permissions on the container.
Careful
- This removes all access permissions on the container.
- When a container is reactivated, permissions are not automatically restored. It is therefore necessary to manually reassign rights to the affected users in order to give them the appropriate access to the container again.
Use as UTI-S
The use of the CCFN requires the use of Web APIs to fully meet the requirements of the NF SOFTWARE – CCFN standard.
All the user functions described in the NF SOFTWARE – CCFN standards are accessible through this API.
The general principles of access and authentication are those of version 2 of the REST APIs.
The API documentation is provided as a downloadable swagger description file below.
The “Swagger editor” tool is a quick and easy way to read it (by importing the description file): https://swagger.io/swagger-editor/
Download the description in swagger format:swagger.yaml
Visualize the swagger: View