The “External SQL connections” screen lists the different external SQL connections and allows you to create new ones.
An external SQL connection contains the information needed to access an existing database.
To create a new connection, click “Add External SQL Connection“.
Here are the different fields to fill in:
Open Bee™ Portal On Premises
Open Bee™ Portal Cloud
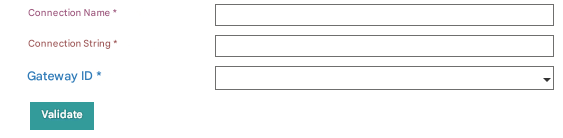
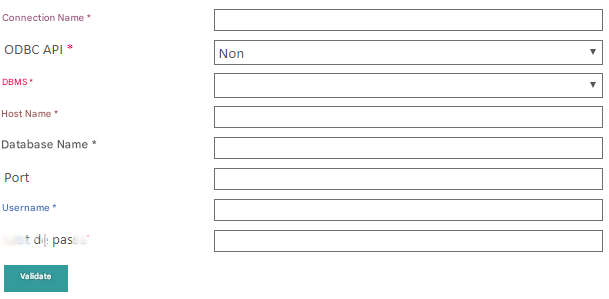
Connection Name : The name you choose for this connection.
ODBC API, to define whether this SQL connection is going to use an ODBC driver.
If this is the case, you will need to fill in the “ODBC Connection String“.
When using a cloud base Open Bee™ Portal, an ODBC connection is mandatory.
Détails configuration ODBC (Open Bee™ Portal Cloud et On Premises)
Open Bee™ Portal Cloud
Using the Cloud SQL module requires you to first install the Open Bee™ Gateway tool on a Windows server in your local network that can access the database.
Note: Only 32-bit ODBC drivers are supported.
After installing Open Bee Gateway, you need to open it and enter the login details to your Open Bee™™ Portal cloud instance
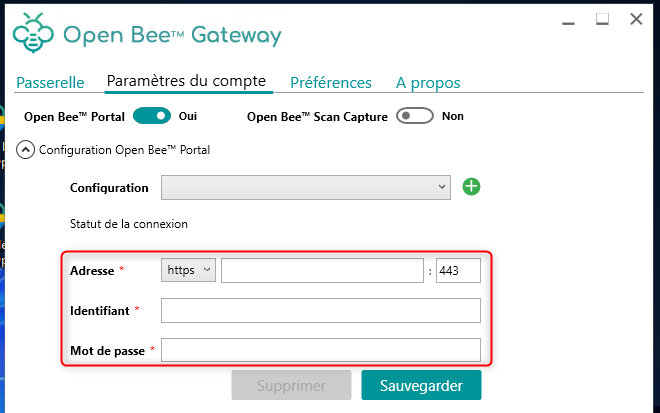
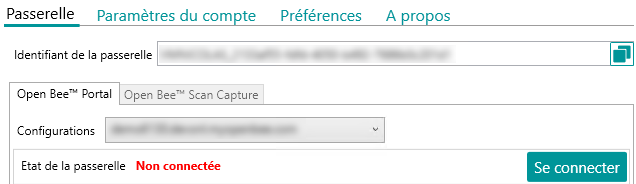
After entering this information, go to the “Gateway” tab and click on “Connect”
Finally, you will be able to go back to the “External SQL Connections” tab of the SQL module of Open Bee™ Portal and create a new connection by entering the ODBC connection string and the Gateway to use.
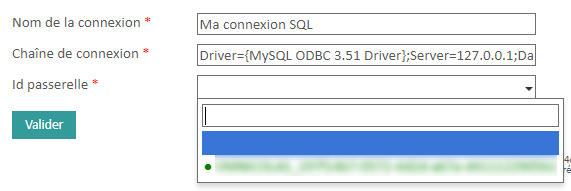
Open Bee™ Portal On Premises
In the case of an ODBC connection on an Open Bee Portal On Premises, it is necessary to prefix the connection string with “odbc:” Example: odbc:Driver={Microsoft Excel Driver (*.xls)}; Dbq=C:\BDD.xls;
The driver will need to be installed, in the case of an Open Bee™ Portal On Premises, on the server, otherwise it will need to be installed on the server where the Gateway is installed.
Note: Only 64-bit ODBC drivers are supported.
Connection Strings
The connection string is specific to the type of database, refer to the ODBC documentation for your DBMS.
You can find examples of ODBC connection strings on this site:https://www.connectionstrings.com/
Examples of connection chains include:
XLS file:
driver={Microsoft Excel Driver (*.xls)}; Dbq=C:\My fichier.xls;
CSV file (only one file must be present in the directory):
driver={Microsoft Text Driver (*.txt; *.csv)}; Dbq=C:\My Directory; extensions=asc,csv,tab,txt;
Microsoft SQL Server:
Driver={SQL Server}; server=<IP>;D atabase=<Comic book>;P ort=<port>; Uid=<wear out>;P wd=<Password>
Oracle:
Driver={Microsoft ODBC for Oracle}; Uid=<wear out>;P wd=<Password>; Server=(DESCRIPTION=(ADDRESS=(PROTOCOL=TCP)(HOST=<IP>)(PORT=<PORT>))(CONNECT_DATA=(SID=<Comic book>)));
Note: For On Premises installations, the odbc: intruction must be added in front of the connection string.
Test the ODBC connection
If an error is returned when creating the connection, tools like Excel can be used to test the ODBC connection string
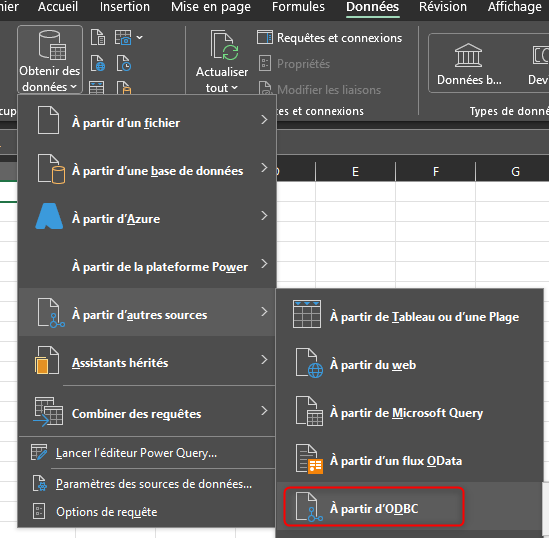
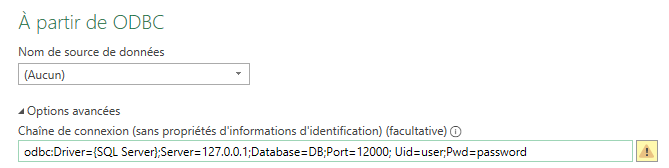
Détails configuration sans pilote ODBC (uniquement Open Bee™ Portal On Premises)
If your connection does not use an ODBC driver, and you are using an Open Bee™ Portal On Premises instance, you can choose the DBMS.
DBMS : 3 types of DBMS are available, value to choose from MySQL, Oracle and SqlServer (version >=2016).
PHP’s PDO extension is used to make the connection.
If you are using Oracle on a Windows environment, you must install the PDO (PDO_OCI) extension.
More information on this link.In case of an Open Open Bee™ Portal update, you will have to re-apply the PDO configuration in the PHP config.ini configuration file.
On a Unix environment, PDO connections to Oracle and SqlServer are not supported, prefer ODBC.
Please note that if you choose the Oracle DBMS, Open Bee™ Portal is only compatible with versions 12c or higher. If you are using an older database, please set up an ODBC connection.
Host Name : The name or IP address of the machine on your local network that hosts the database you want to query.
Database Name : The name of the existing database to be queried
Port : The port used to access the database server.
Identifier : The identifier used to connect to the database.
Password : the password linked to the username entered above.
In order to secure your database and avoid errors, please use a user account that has only SELECT rights to your database on the necessary tables.
This will prevent data from being inserted, updated, or deleted in your DBMS.
Don’t forget to save the information you have entered by clicking on “Validate“.